Most of what makes a PR box expensive, slow, or perfect gets decided on the spec sheet, not at the mockup stage. A supplier can only quote what you define, and vague briefs come back as vague prices with long timelines baked in for the unknowns. This walkthrough goes line by line through the specification a custom PR box actually needs, and shows how each decision moves cost, minimum order quantity, and lead time. Settle these before you ask for a quote and the numbers you get back will be tighter and comparable across vendors.
Start with construction, because it sets the ceiling
The first line on the spec is the box style, and it constrains everything after it. A printed corrugated mailer, the self-locking crash-lock or roll-end style, ships flat, protects well in transit, and reaches the lowest per-unit price, which is why it dominates influencer seeding at scale. A rigid setup box, chipboard wrapped in a printed litho sheet, delivers the heavy, magnetic-lid feel associated with luxury gifting, but it costs more, needs tooling, and ships pre-assembled, so it takes more space and freight. Folding cartons and telescoping two-piece boxes sit in between. Decide this first, because a mailer and a rigid box are not the same quote with a different finish.
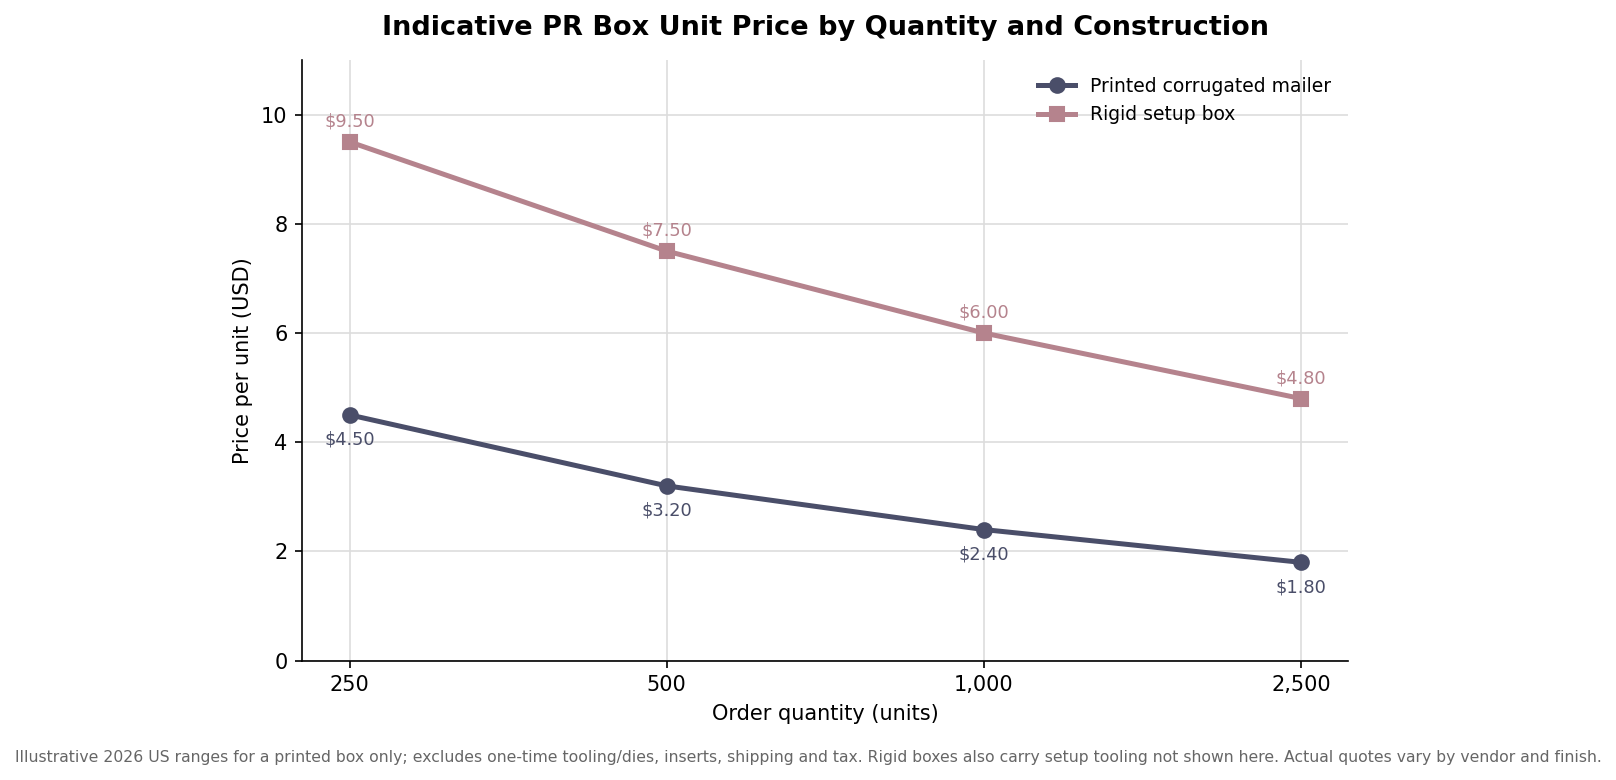
The line chart shows the gap. A rigid box can run two to three times the unit price of a mailer at the same quantity, and both curves fall as volume rises. Note what the chart leaves out: rigid boxes usually carry one-time tooling, and neither line includes inserts or shipping. Treat the figures as indicative ranges for framing a budget, not as a quote.
Board grade, thickness, and internal dimensions
Once construction is set, specify the board. Corrugated mailers are defined by flute grade, with E-flute around 1.5 millimeters for a smooth print surface and B-flute nearer 3 millimeters for more protection. Rigid boxes are built on greyboard, commonly 1.5 to 3 millimeters thick, where thicker reads as more premium in the hand. Then give internal dimensions, not external, and state them as length by width by depth measured to the product plus insert clearance. A tolerance of two to three millimeters around the contents keeps the product from rattling without forcing a custom insert to fight the walls. Oversizing here quietly raises both material cost and dimensional weight, so tight, deliberate internal dimensions are one of the cheapest ways to control the total. It is worth noting the trade-off, too: a thinner E-flute prints beautifully but offers less crush resistance, so if the box will travel through a carrier network with heavy handling, the extra millimeter of board can be the difference between a clean unboxing and a dented one on camera.
Print method and the finishes that carry the brand
How the box is decorated is a cost and timeline decision as much as an aesthetic one. Digital printing suits low quantities and variable or short-run designs. Litho lamination, a printed sheet laminated to the board, gives the best photographic and gradient reproduction on corrugated and is the workhorse for premium mailers. Flexo printing is economical at high volumes but is better for solid spot colors than fine detail. On top of the print sit the finishes that most influence perceived value: soft-touch matte lamination, gloss, spot UV, foil stamping, and emboss or deboss. Each finish is a separate pass, so each adds a little cost and a little time, and stacking several is what turns a mid-tier box into a showpiece and a longer lead time at once.
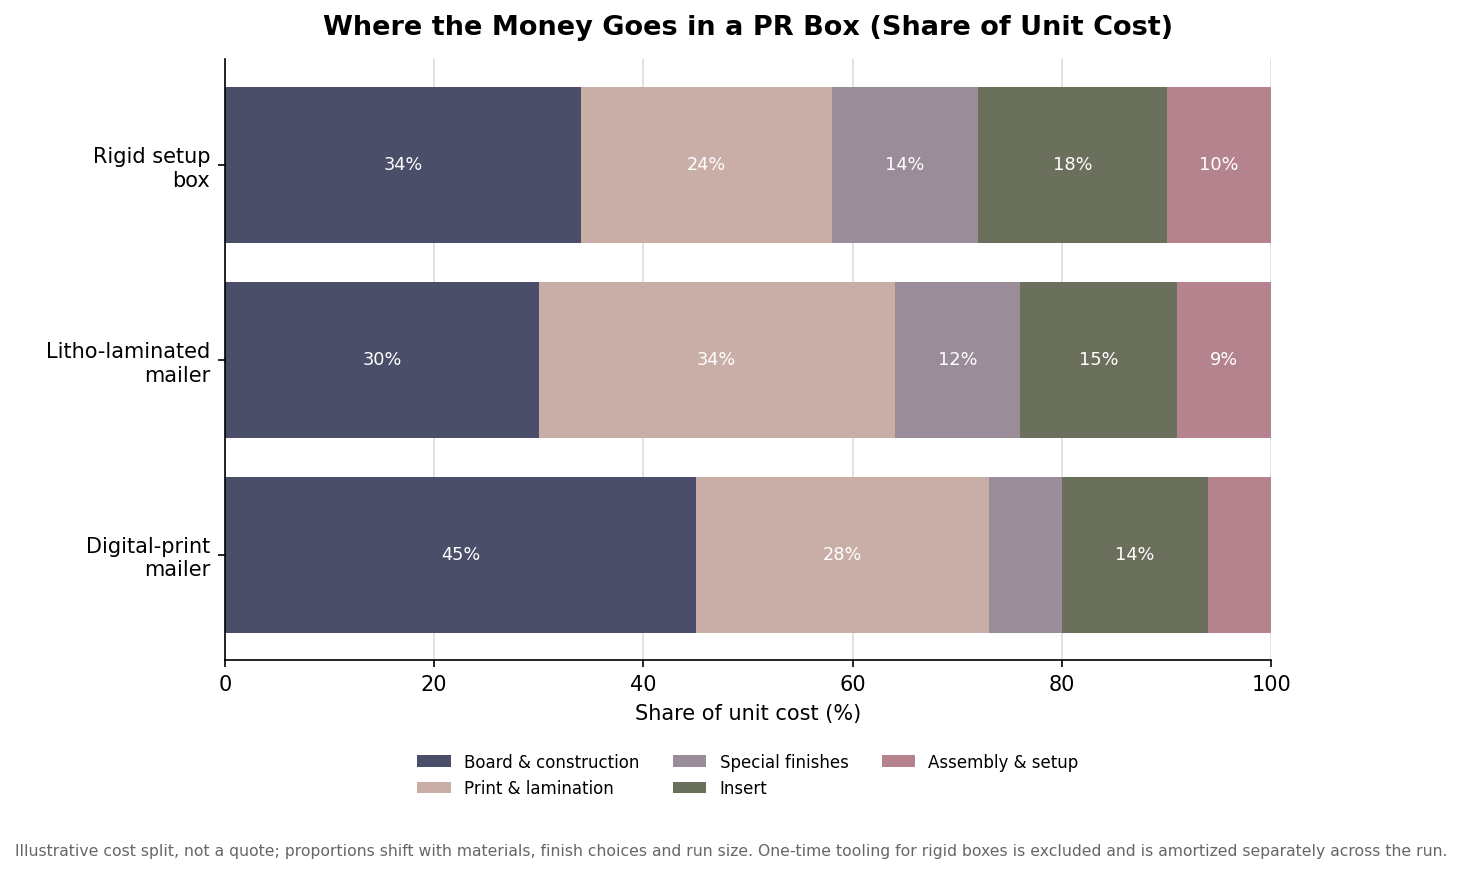
The stacked view gives a feel for where the money goes across three common tiers. Board and construction anchor the cost on a simple mailer, while print, lamination, and finishes claim a larger share as you move upmarket. The split is illustrative and shifts with your specific choices, but it is a useful reminder that finishes and inserts, not just the box itself, decide the final unit cost.
Insert, quantity, and the tooling question
The insert is part of the spec, not an afterthought, because it protects the product and stages the reveal. Options run from die-cut corrugated and folded board to molded pulp and foam, each with its own cost and its own tooling. That word, tooling, is the one to pin down early. Custom dies and rigid-box formes are one-time charges that get amortized across the run, so they hit hard at low quantities and fade at high ones. This is why minimums matter: digital mailers can start around 100 to 250 units, while litho-laminated and rigid work often sets a floor of 500 to 1,000 to make the setup worthwhile. If you are near a price break, pricing the next quantity up frequently lowers the per-unit cost enough to be worth it.
Lead time, and putting the spec together
Finally, state the deadline against realistic production windows. A digital-printed mailer might turn in one to two weeks, a litho-laminated corrugated box in roughly three to four, and a rigid setup box in four to six once tooling and assembly are counted, with special finishes adding time on top. Build in a pre-production sample and shipping, and you can see how a launch date works backward into an order date. A complete PR box spec, then, reads as a short list any vendor can quote from directly: construction, board grade and thickness, internal dimensions with tolerance, print method, finishes, insert, quantity, and required in-hands date. Define those eight lines and you have replaced a guessing game with a brief, which is what turns a wide range of quotes into a decision you can actually make.
Leave a Reply