Category: Uncategorized

  • How to Write a PR Box Spec: The Eight Lines That Decide Cost and Lead Time

    How to Write a PR Box Spec: The Eight Lines That Decide Cost and Lead Time

    Most of what makes a PR box expensive, slow, or perfect gets decided on the spec sheet, not at the mockup stage. A supplier can only quote what you define, and vague briefs come back as vague prices with long timelines baked in for the unknowns. This walkthrough goes line by line through the specification a custom PR box actually needs, and shows how each decision moves cost, minimum order quantity, and lead time. Settle these before you ask for a quote and the numbers you get back will be tighter and comparable across vendors.

    Start with construction, because it sets the ceiling

    The first line on the spec is the box style, and it constrains everything after it. A printed corrugated mailer, the self-locking crash-lock or roll-end style, ships flat, protects well in transit, and reaches the lowest per-unit price, which is why it dominates influencer seeding at scale. A rigid setup box, chipboard wrapped in a printed litho sheet, delivers the heavy, magnetic-lid feel associated with luxury gifting, but it costs more, needs tooling, and ships pre-assembled, so it takes more space and freight. Folding cartons and telescoping two-piece boxes sit in between. Decide this first, because a mailer and a rigid box are not the same quote with a different finish.
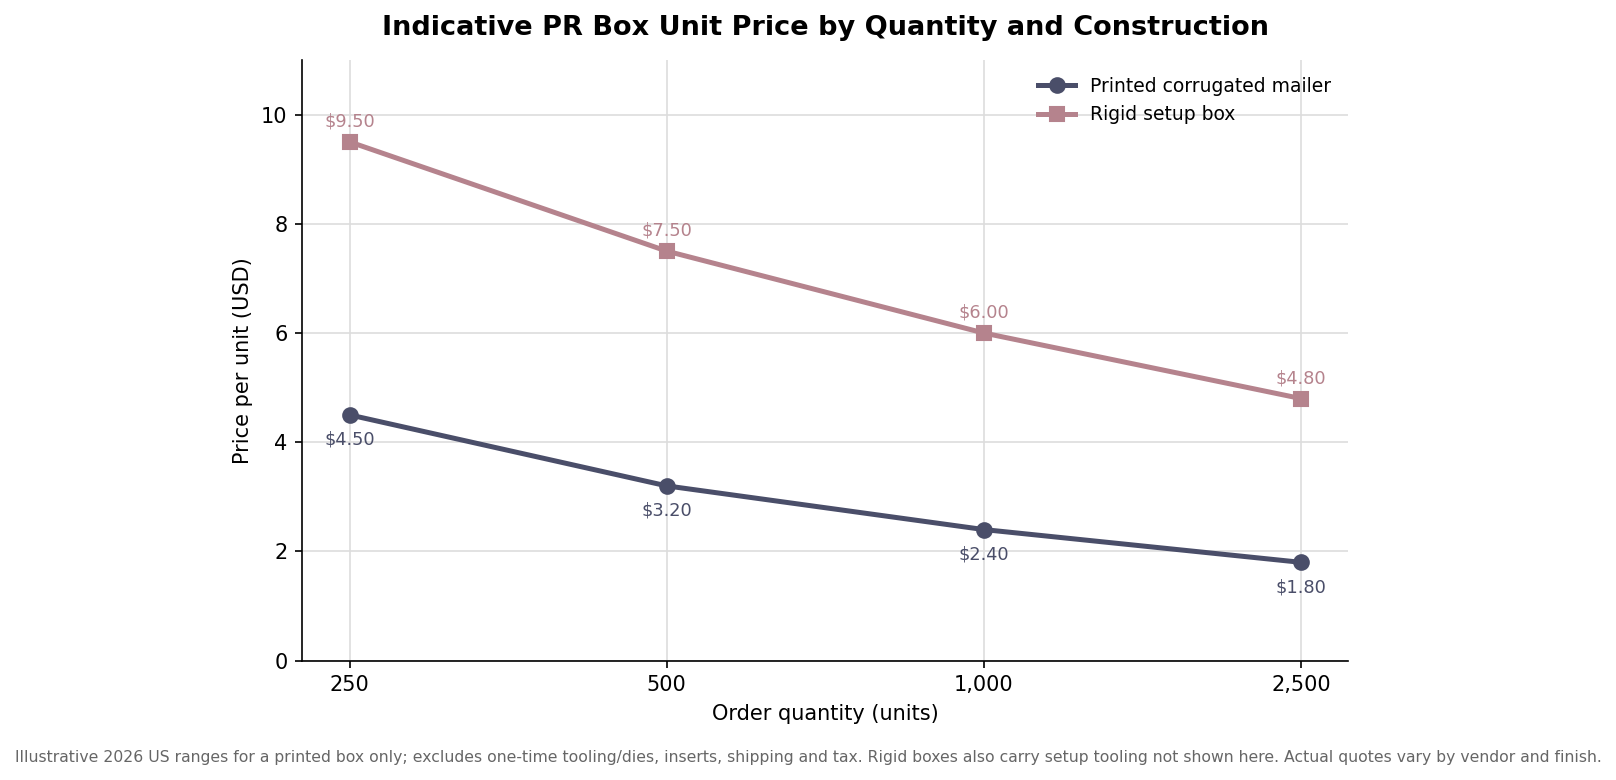
    Line chart of indicative PR box unit price by order quantity for corrugated mailer versus rigid setup box
    Rigid setup boxes can cost two to three times a mailer at the same quantity, and both fall with volume.

    The line chart shows the gap. A rigid box can run two to three times the unit price of a mailer at the same quantity, and both curves fall as volume rises. Note what the chart leaves out: rigid boxes usually carry one-time tooling, and neither line includes inserts or shipping. Treat the figures as indicative ranges for framing a budget, not as a quote.

    Board grade, thickness, and internal dimensions

    Once construction is set, specify the board. Corrugated mailers are defined by flute grade, with E-flute around 1.5 millimeters for a smooth print surface and B-flute nearer 3 millimeters for more protection. Rigid boxes are built on greyboard, commonly 1.5 to 3 millimeters thick, where thicker reads as more premium in the hand. Then give internal dimensions, not external, and state them as length by width by depth measured to the product plus insert clearance. A tolerance of two to three millimeters around the contents keeps the product from rattling without forcing a custom insert to fight the walls. Oversizing here quietly raises both material cost and dimensional weight, so tight, deliberate internal dimensions are one of the cheapest ways to control the total. It is worth noting the trade-off, too: a thinner E-flute prints beautifully but offers less crush resistance, so if the box will travel through a carrier network with heavy handling, the extra millimeter of board can be the difference between a clean unboxing and a dented one on camera.

    Print method and the finishes that carry the brand

    How the box is decorated is a cost and timeline decision as much as an aesthetic one. Digital printing suits low quantities and variable or short-run designs. Litho lamination, a printed sheet laminated to the board, gives the best photographic and gradient reproduction on corrugated and is the workhorse for premium mailers. Flexo printing is economical at high volumes but is better for solid spot colors than fine detail. On top of the print sit the finishes that most influence perceived value: soft-touch matte lamination, gloss, spot UV, foil stamping, and emboss or deboss. Each finish is a separate pass, so each adds a little cost and a little time, and stacking several is what turns a mid-tier box into a showpiece and a longer lead time at once.
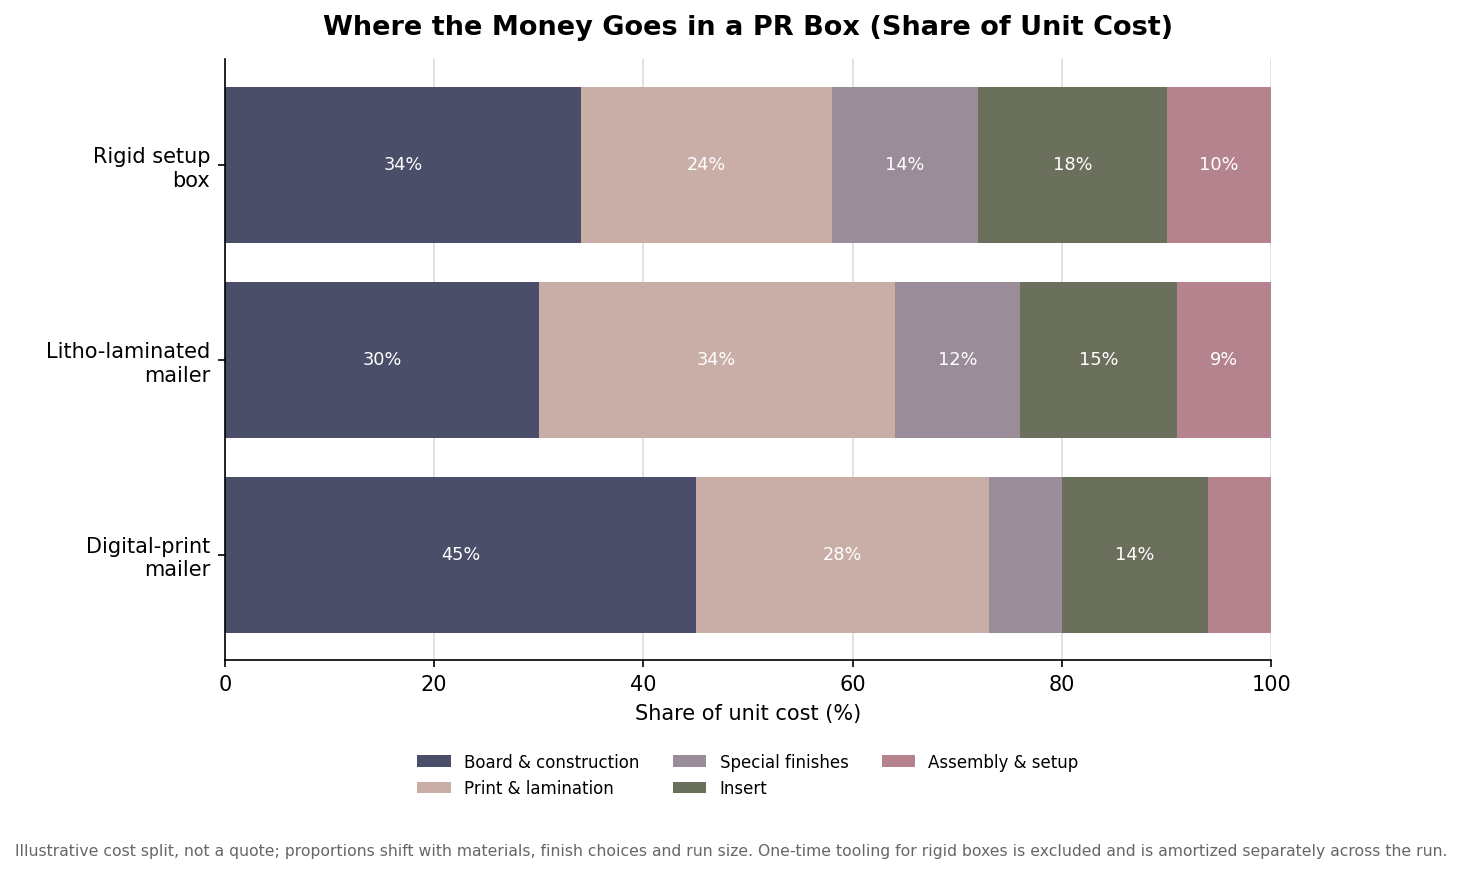
    Horizontal stacked bar chart showing the share of PR box unit cost by component across three box tiers
    As boxes move upmarket, print, lamination, and finishes claim a growing share of the unit cost.

    The stacked view gives a feel for where the money goes across three common tiers. Board and construction anchor the cost on a simple mailer, while print, lamination, and finishes claim a larger share as you move upmarket. The split is illustrative and shifts with your specific choices, but it is a useful reminder that finishes and inserts, not just the box itself, decide the final unit cost.

    Insert, quantity, and the tooling question

    The insert is part of the spec, not an afterthought, because it protects the product and stages the reveal. Options run from die-cut corrugated and folded board to molded pulp and foam, each with its own cost and its own tooling. That word, tooling, is the one to pin down early. Custom dies and rigid-box formes are one-time charges that get amortized across the run, so they hit hard at low quantities and fade at high ones. This is why minimums matter: digital mailers can start around 100 to 250 units, while litho-laminated and rigid work often sets a floor of 500 to 1,000 to make the setup worthwhile. If you are near a price break, pricing the next quantity up frequently lowers the per-unit cost enough to be worth it.

    Lead time, and putting the spec together

    Finally, state the deadline against realistic production windows. A digital-printed mailer might turn in one to two weeks, a litho-laminated corrugated box in roughly three to four, and a rigid setup box in four to six once tooling and assembly are counted, with special finishes adding time on top. Build in a pre-production sample and shipping, and you can see how a launch date works backward into an order date. A complete PR box spec, then, reads as a short list any vendor can quote from directly: construction, board grade and thickness, internal dimensions with tolerance, print method, finishes, insert, quantity, and required in-hands date. Define those eight lines and you have replaced a guessing game with a brief, which is what turns a wide range of quotes into a decision you can actually make.
  • Shipping a PR Box: Board Grades, Box Size, and What You Pay to Send It

    Shipping a PR Box: Board Grades, Box Size, and What You Pay to Send It

    A PR box has two jobs that pull in opposite directions. It has to look flawless the moment a creator lifts the lid on camera, and it has to survive a cross-country trip through a carrier network that treats every parcel the same. Those goals live in different parts of the package, and the specification that satisfies both comes down to a few board grades and one shipping formula that quietly sets your bill. Here is how to read them before you approve artwork.

    How to read a board grade

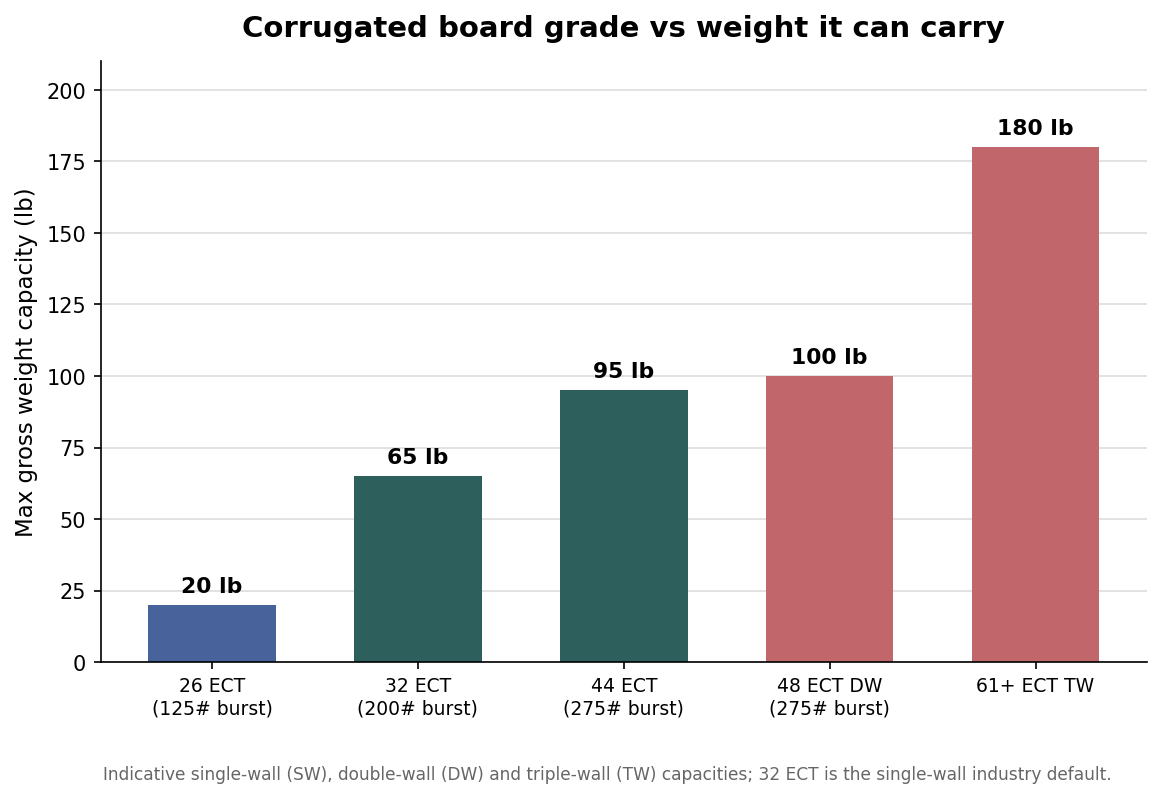
    Corrugated board is rated two ways, and a spec sheet usually shows both. The Edge Crush Test (ECT) measures top-to-bottom stacking strength — how much pressure the walls take before they crush, which is what matters when boxes sit stacked on a pallet or under other parcels in a truck. The Mullen or burst test measures how much pressure the wall takes before it ruptures, which speaks to puncture and rough handling. A single-wall 32 ECT board, equivalent to a 200-pound burst rating, is the industry default and carries a gross weight up to roughly 65 pounds. Step down to 26 ECT and you are limited to about 20 pounds; step up to 44 ECT, or a 275-pound burst rating, and you reach about 95 pounds. Double-wall board near 48 ECT handles roughly 100 pounds, and triple-wall grades go well beyond that. For a PR box, whose contents are usually light, the grade is less about weight and more about keeping edges crisp and corners square after handling.

    Bar chart of corrugated board grades (26, 32, 44 ECT single-wall, 48 ECT double-wall, 61+ ECT triple-wall) against maximum gross weight capacity in pounds
    Board grade sets how much a box can carry; 32 ECT is the single-wall default.

    The box inside the box

    The trap most first-time buyers fall into is asking one box to be both the beautiful unboxing piece and the shipping container. The printed PR box — the one with your foil, your color, your magnetic lid — is almost always built from a thin micro-flute board, E-flute at about 1/16 inch or the even finer F-flute, precisely because a thin, tight surface prints sharply and folds cleanly. That same thinness is poor protection in transit. The reliable pattern is a two-part system: the presentation box travels inside a plain 32 ECT corrugated shipper, cushioned so the pretty box arrives with unblemished edges. It costs a little more and adds a few ounces, but it is the difference between a creator filming a pristine reveal and filming a dented lid.

    If budget forces a single box, specify a sturdier board for the printed box itself and design the artwork to hide scuffs. Darker colors and matte finishes forgive handling marks far better than gloss white, which shows every scrape and fingerprint the network leaves behind.

    Why box size, not weight, sets your bill

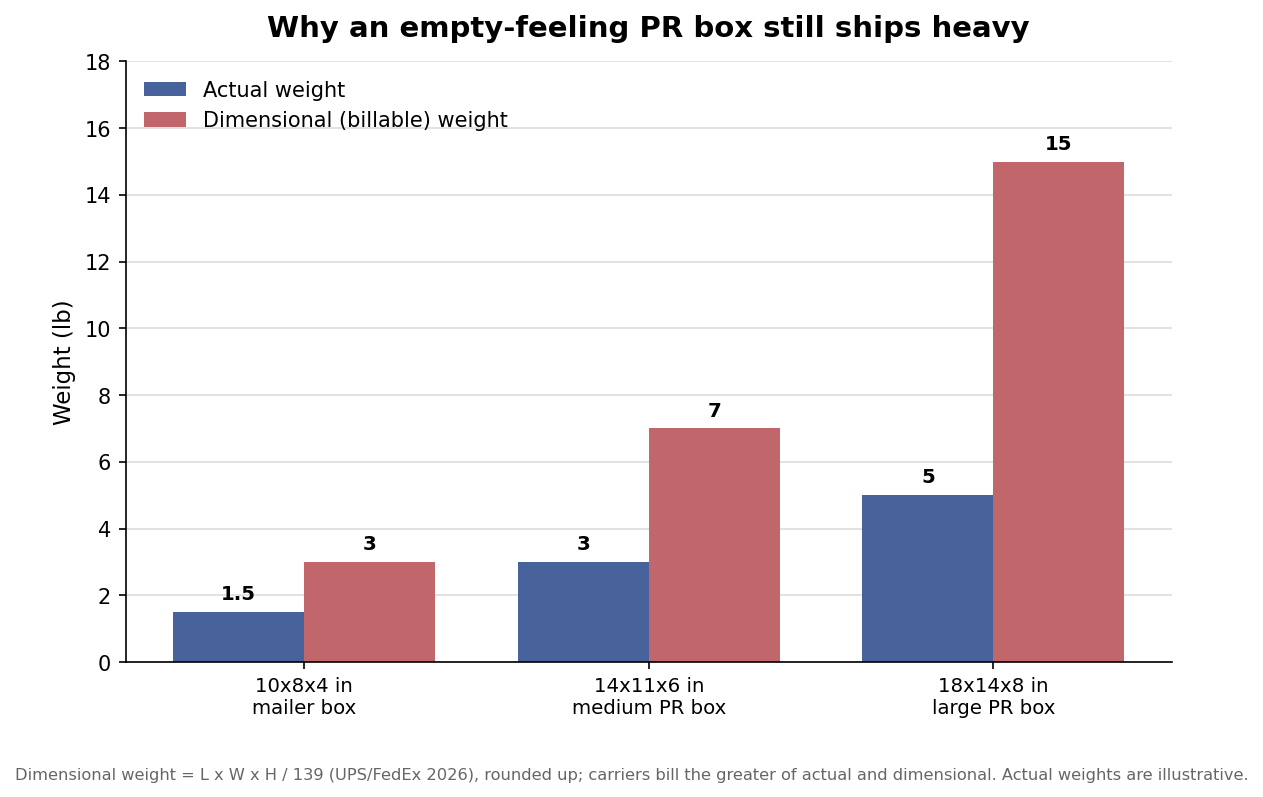
    PR boxes are light and roomy, which is exactly the profile carriers price most aggressively. UPS and FedEx bill on dimensional weight: multiply length by width by height in inches, divide by 139, then compare that figure to the actual scale weight and charge whichever is greater. A box that weighs three pounds but measures 14 by 11 by 6 inches works out to 924 cubic inches over 139, or about seven pounds billable — more than double its real weight. Scale the box up to 18 by 14 by 8 inches and the billable figure jumps to roughly fifteen pounds, no matter how little sits inside. The lesson is to size the box to the product with intent, because every empty inch is billed as if it were full.

    One 2026 detail sharpens this further. Since the rule change that took effect in August 2025, carriers round every fractional dimension up to the next whole inch before running the formula. A box measured at 11.1 by 8.5 by 6.2 inches is billed as 12 by 9 by 7, which in that example lifted the billable weight by nearly 40 percent. When you approve a die line, the outside dimensions are a cost decision, not only an aesthetic one.

    Grouped bar chart comparing actual weight to dimensional billable weight for three PR box sizes, showing dimensional weight governs for light roomy boxes
    For light, roomy PR boxes the dimensional weight, not the scale weight, sets the bill.

    Protecting what is inside

    Void fill is the unglamorous line item that saves the campaign. The goal is to immobilize the contents so nothing shifts, rattles, or presses against the lid during transit. Molded pulp and die-cut foam inserts hold products in a fixed position and double as part of the reveal, which is why they earn their cost on a premium kit; loose fill and crumpled paper protect adequately but read as cheap on camera, so keep them to the outer shipper where the creator never sees them. For fragile beauty items — glass droppers, pressed powders, anything that shatters or cracks — plan for at least an inch of cushioning on every side and test a packed sample by shaking it. If you can hear or feel movement, the insert is not doing its job yet.

    Specifying it right

    Bring the whole picture together before you sign off. Decide the finished product first, then size the printed box to it with as little dead air as possible. Choose a micro-flute printed box for the reveal and pair it with a 32 ECT shipper unless the contents are unusually heavy, in which case move to 44 ECT or double-wall board. Run your outside dimensions through the dimensional-weight formula so the shipping cost is a number you chose rather than one that surprises you at invoice time. And approve a physical packed sample, shaken and inspected, before you commit to a production run — the few days that adds is far cheaper than a warehouse of boxes that dent in the mail.

  • Sustainable PR Box Materials: Choosing Recyclable Boxes, Inserts, and Finishes

    Sustainable PR Box Materials: Choosing Recyclable Boxes, Inserts, and Finishes

    A PR box does two jobs at once. It has to survive a courier network and then look immaculate the moment a creator opens it on camera. More brands now want it to do a third thing: hold up as a genuinely recyclable package rather than a glossy box that quietly ends up in landfill. Those goals pull against each other, and the material choices you make at the quote stage decide which one wins. This guide walks through the box body, the insert, the board strength, and the finishes, with the trade-offs stated in plain numbers so you can specify a box that is both unboxing-ready and honestly sustainable.

    The box body: corrugated, rigid, or a hybrid

    Corrugated mailer boxes are the default for seeding campaigns because they are light, printable, and recyclable in most curbside programs. The fluted middle layer gives them structure while keeping the walls thin. A single-wall corrugated mailer is usually all a beauty or apparel drop needs, and it folds flat for storage and lower freight cost. Rigid setup boxes, the kind with a solid greyboard core wrapped in printed paper, feel more premium and hold a magnetic-close lid beautifully, but that construction is where sustainability gets complicated. The greyboard is typically 1.5 to 3 millimeters thick, and the outer wrap is often laminated, which can push the finished box out of curbside recycling even though the core is paper. Magnets and ribbon add further contamination. A practical middle path is an E-flute corrugated box with a crisp printed surface: the thin flute (roughly 1.5 millimeters) prints almost as sharply as a rigid wrap and reads as premium on camera, while staying a single, recyclable paper stream.

    Inserts decide whether the box is truly recyclable

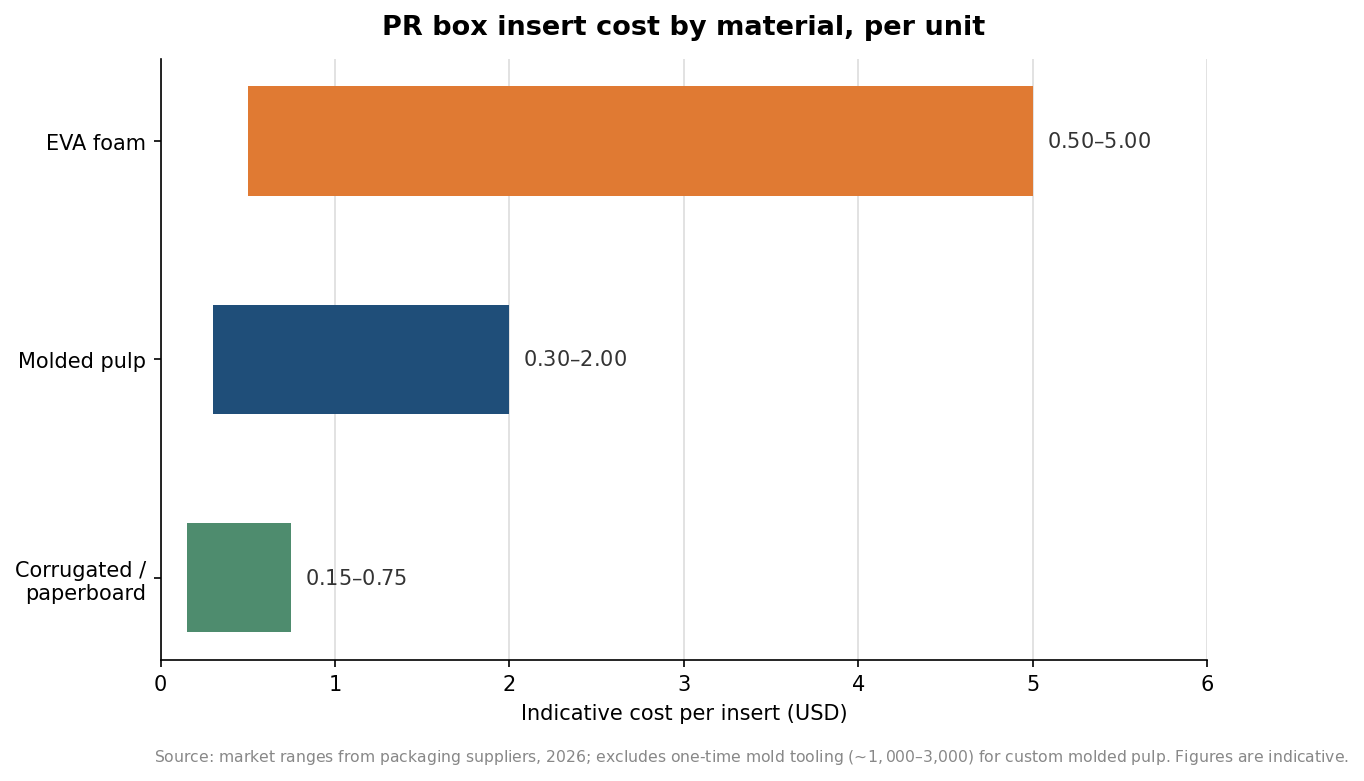
    The insert is the part buyers underestimate and the part that most often breaks a recycling claim. A foam insert cradles a fragile product better than anything else, but EVA and PU foams are not curbside recyclable and undercut the whole sustainability story. Molded pulp, made from recycled paper fiber, is compostable and recyclable and photographs as a clean matte tray, which is why it has become the go-to for premium eco drops. Die-cut corrugated or paperboard inserts are the cheapest option and stay in the same recyclable paper stream as the box. The cost gap is real and worth seeing before you commit, especially because molded pulp also carries a one-time mold tooling cost, commonly in the region of $1,000 to $3,000, that only makes sense once your volumes are high enough to amortize it.

    Horizontal bar chart comparing PR box insert cost per unit for corrugated, molded pulp, and EVA foam
    Insert cost per unit by material; molded pulp also carries a one-time mold tooling cost.

    The tooling math matters more than the per-unit number. At a few hundred units, a die-cut corrugated tray at $0.15 to $0.75 each will almost always beat molded pulp once you fold in the mold cost. Molded pulp earns its place at higher, repeated volumes where the mold cost spreads thin and the material’s appearance and eco-credentials justify the premium. Foam, at $0.50 to $5.00 per unit depending on complexity, is best reserved for genuinely fragile electronics or glass where protection outranks the recycling goal, and even then many brands now switch to molded pulp with a paper-based cushioning layer to keep the package single-stream.

    Board strength: reading ECT so the box survives the courier

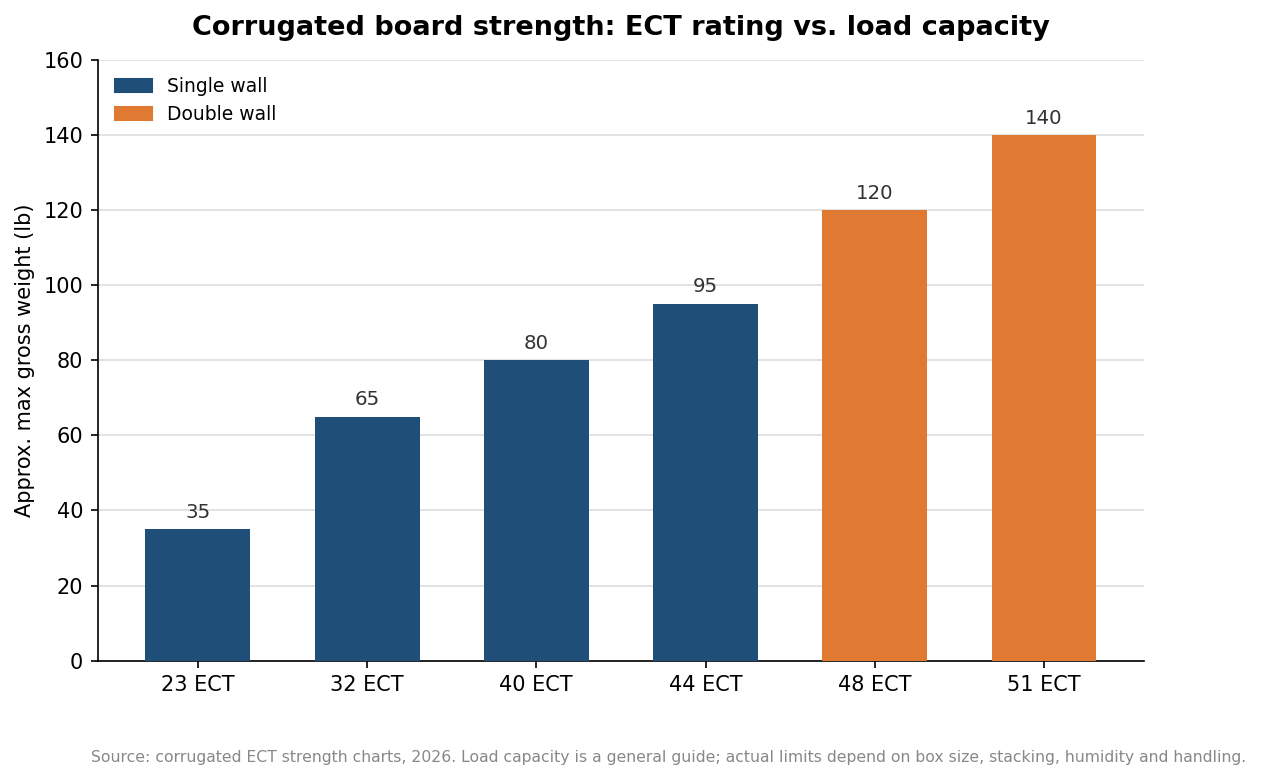
    Edge Crush Test, or ECT, is the number that tells you how much stacking force a corrugated board can take. It is the spec to get right, because a box that looks perfect but arrives crushed defeats the entire campaign. 32 ECT single-wall is the most common e-commerce grade and handles a gross packed weight up to roughly 65 pounds, which is far more than any beauty or apparel PR box will ever weigh; here the limiting factor is stacking in transit, not the product weight. Stepping up to 44 ECT raises the ceiling toward 95 pounds and buys extra resilience if boxes are stacked five or more high in a warehouse or if you are shipping heavier tech kits. Double-wall grades such as 48 ECT push past 120 pounds and are overkill for most seeding work.

    Bar chart of corrugated board ECT ratings against approximate maximum load capacity in pounds
    Higher ECT ratings carry more stacking load; single-wall 32 ECT covers most PR boxes.

    These load figures are a general guide rather than a guarantee. Real-world strength drops with box size, humidity, rough handling, and how long a box sits under load, so treat the numbers as headroom and not a target to fill. For a typical PR box weighing one to three pounds packed, 32 ECT single-wall with a well-fitted insert is usually the right and most economical call; reserve heavier board for oversized boxes or campaigns where you know the courier stacks hard.

    Inks, coatings, and the claims you can actually back

    Finishes are where a sustainable box is quietly won or lost. Water-based and soy-based inks print cleanly on corrugated and do not interfere with recycling the way heavy plastic coatings can. The finish that most often breaks recyclability is a full plastic lamination, matte or gloss, laid across the whole box; it looks luxurious but can render the paper non-recyclable in many programs. If you want a premium surface while keeping the box curbside-friendly, spot treatments are the smarter route: a spot-UV highlight, a blind emboss, or a small foil detail keeps the majority of the surface as bare, recyclable board. Void fill follows the same logic. Crinkle paper, honeycomb wrap, and paper shred stay in the recyclable stream, while bubble wrap and air pillows introduce plastic that a creator has to separate out on camera.

    Certifications should be specific, not decorative. If you plan to say a box is responsibly sourced, ask the printer for FSC chain-of-custody documentation on the board rather than a generic leaf logo, and if you claim recycled content, ask for the post-consumer waste percentage in writing. Avoid vague words like eco or green on the packaging itself unless you can point to the underlying material spec, because unsupported environmental claims are increasingly scrutinized. The honest position is usually the strongest one: a single-material corrugated box, a paper-based insert, water-based inks, and paper void fill make a package that a recipient can drop in one bin, and that simple truth is more persuasive than a laminated box with a green sticker.

    Put together, the specification that satisfies both the camera and the recycling bin is less exotic than it sounds. Start with an E-flute or 32 ECT single-wall corrugated body, choose a die-cut paperboard or molded-pulp insert sized to the product, print with water-based inks, add a spot finish instead of full lamination, and fill with paper. It ships well, it opens beautifully, and every part of it goes in the same bin. Lead times and minimum order quantities vary widely by supplier and by whether custom tooling is involved, so confirm both in writing before you lock a launch date.

  • Choosing the Right Insert for Your PR Box: Foam, Molded Pulp, Board, and Corrugated

    Choosing the Right Insert for Your PR Box: Foam, Molded Pulp, Board, and Corrugated

    The outside of a PR box earns the first reaction, but the insert decides two things that matter more: whether the product arrives intact and whether the reveal looks deliberate instead of thrown together. A hero product rattling around in loose shred reads as careless on camera, and a cracked item never gets filmed at all. Choosing the insert is really a four-way trade among protection, presentation, sustainability, and cost, and for PR boxes sustainability carries extra weight, because the creators you are courting will happily call out wasteful packaging to the exact audience you are trying to reach.

    The four insert families and what each is really for

    Die-cut foam (usually EVA or polyurethane) is the protection benchmark. Cavities are cut to the exact silhouette of your product, so a heavy or fragile item sits locked in place with real shock absorption around it. Foam also has the most premium hand-feel, especially when faced with a cloth or silk layer, which is why luxury and electronics kits lean on it. Its weakness is environmental: it is plastic-based, not curbside recyclable, and comes in a limited palette, typically black or white.

    Molded pulp, also called molded fiber, is pressed from recycled paper into a custom contoured tray. It fits products precisely and looks clean and intentional, and it is compostable and recyclable, which is the single biggest reason it keeps replacing foam in beauty and premium retail. It cushions well, though not quite to foam’s level, and its print options are limited to the natural fiber look. Paperboard trays and platforms are folded or die-cut from printable board, so they take full-color graphics across the whole insert and are the most brandable option, best suited to lighter products where organization matters more than impact protection. Corrugated inserts and dividers are the workhorse: cheap, fully recyclable, and good at separating multiple items or absorbing transit forces for medium-weight goods, at the cost of a more utilitarian look.

    What it costs, and where the money goes

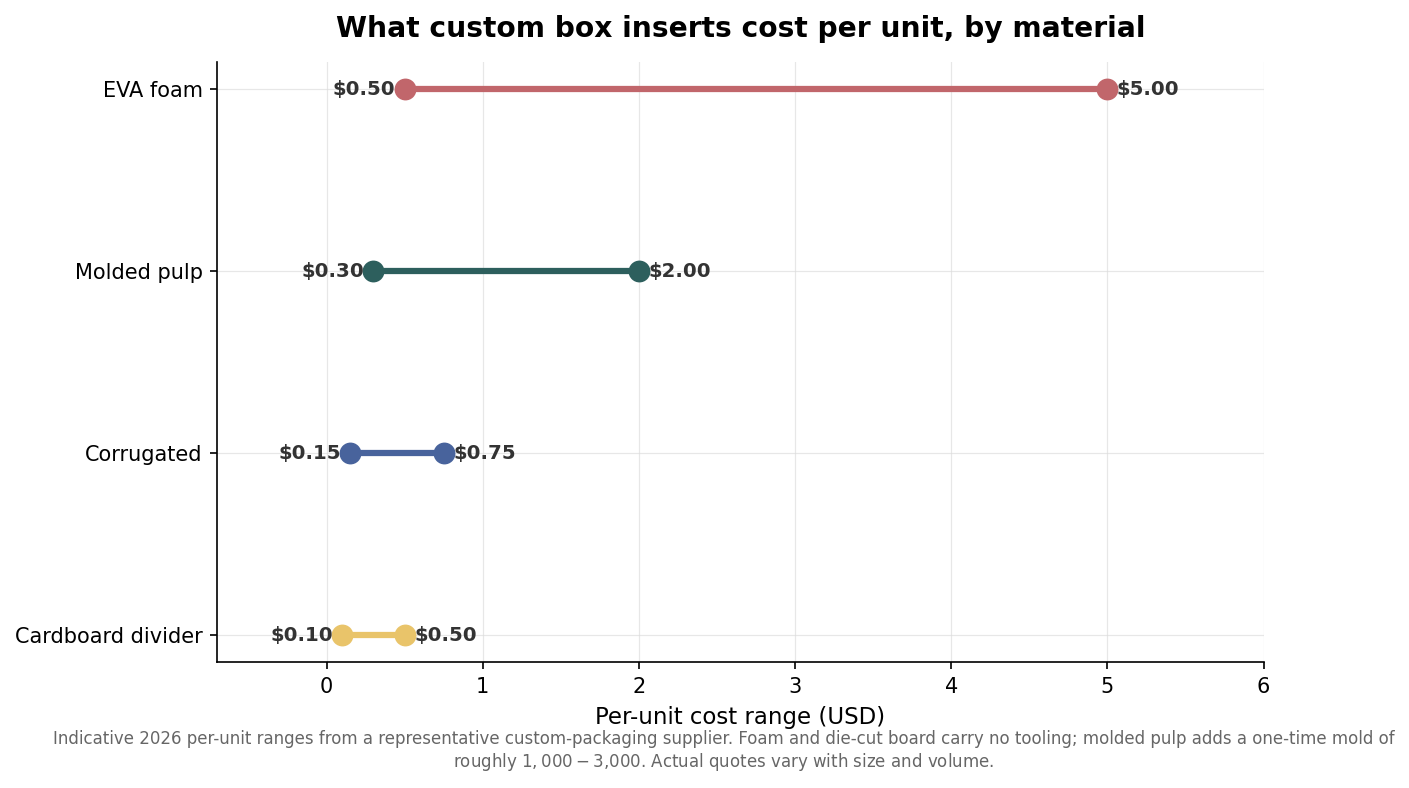
    Per-unit prices span a wide range, and the material you pick sets the floor. Working from one representative custom-packaging supplier’s 2026 figures, die-cut foam runs roughly $0.50 to $5.00 per unit depending on size and complexity, molded pulp about $0.30 to $2.00, corrugated cushioning $0.15 to $0.75, and simple cardboard dividers as little as $0.10 to $0.50. Those are indicative ranges rather than quotes, and they move with dimensions, quantity, and finish.

    Range chart of per-unit cost for foam, molded pulp, corrugated, and cardboard box inserts
    Per-unit insert cost by material, before any one-time tooling for molded pulp molds.

    The per-unit number is only half the cost story. The hidden line item is tooling. Foam is CNC-routed straight from a CAD file, so there is no separate tooling charge, and die-cut board inserts are cut from flat stock with an inexpensive die. Molded pulp is the exception: it needs a custom mold that typically runs about $1,000 to $3,000 as a one-time cost. On a small PR drop of a few hundred boxes that mold can dominate the math, while on a recurring program it amortizes to almost nothing. If you expect to reorder the same insert, molded pulp gets cheaper every time; if this is a one-off, a printed board tray often wins on total cost.

    The protection-versus-planet trade you cannot dodge

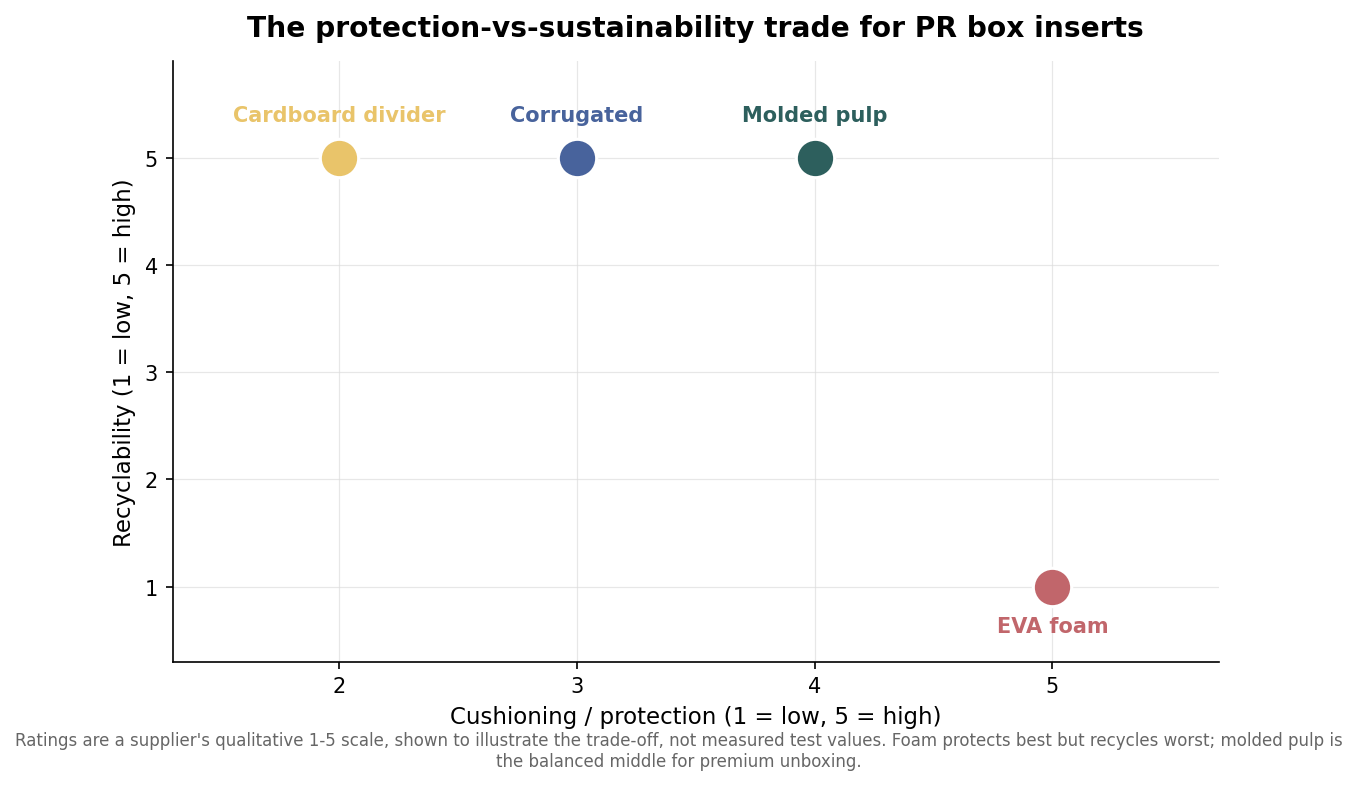
    There is no insert that maxes out every axis, and it helps to see the trade plainly. Foam is the clear winner on cushioning and the clear loser on recyclability. The three paper-based options all recycle well, but their protection drops as they get cheaper, from molded pulp’s contoured cushioning down to a divider that only keeps items from touching.

    Scatter plot of insert protection versus recyclability for foam, molded pulp, corrugated, and cardboard
    Foam protects best but recycles worst; molded pulp is the balanced middle for premium unboxing.

    For a PR box specifically, that upper-middle zone is usually the sweet spot. Molded pulp gives you most of foam’s snug, custom fit and premium impression while staying recyclable, which is why it has become the default for eco-conscious beauty and lifestyle launches. Reserve foam for genuinely fragile or heavy hero products where a cracked item would sink the whole send, and reach for printed board when the product is light and the story is the graphics.

    Match the insert to the product and the moment

    Start from the product, not the aesthetic. A single fragile hero item, such as a glass bottle or a device, justifies foam or a well-designed molded pulp tray, because the cost of one shattered unit on an influencer’s doorstep is far higher than the insert. A curated multi-item set, the classic beauty or snack PR box, is a job for a molded pulp or printed board tray with defined pockets, so each piece has a home and the arrangement photographs as intentional. A lightweight single product with a strong visual identity can ride on a full-color printed platform that doubles as brand real estate. And when the brand’s entire pitch is sustainability, the insert has to back that up, because a plastic foam tray inside a kraft box is the kind of contradiction creators notice and mention on camera.

    Lead time and minimums

    Finally, let the calendar influence the choice. Foam and die-cut board move fast because there is no mold to build, so they suit tight timelines and last-minute additions. Molded pulp’s custom mold adds real weeks of tooling before the first insert exists, which is fine for a planned launch but painful for a rush. Minimums for custom PR boxes themselves can start low, in some cases around 50 units, which keeps small, targeted sends viable, but a molded pulp mold only pays off across a larger or repeating run. Decide early, because the insert is the one component most likely to add tooling time, and pin it down before the box artwork is finalized so the two are engineered to fit each other rather than forced together at the end.

  • Influencer Kit Packaging: The PR Box Mistakes That Show Up in Transit and on Camera

    Influencer Kit Packaging: The PR Box Mistakes That Show Up in Transit and on Camera

    A PR box is unusual among packaging jobs because it has two audiences that never meet: the carrier that throws it across a hub at two in the morning, and the creator who films opening it in soft light for an audience of thousands. Brands obsess over the second and forget the first, and that gap is where most PR box budgets quietly leak. The box that looks flawless in a mockup can arrive dented, over-billed, or full of a product that rattled loose in transit. The mistakes below are the ones that show up after the artwork is approved, when it is expensive to fix.

    Sizing the box for the reveal instead of the shipment

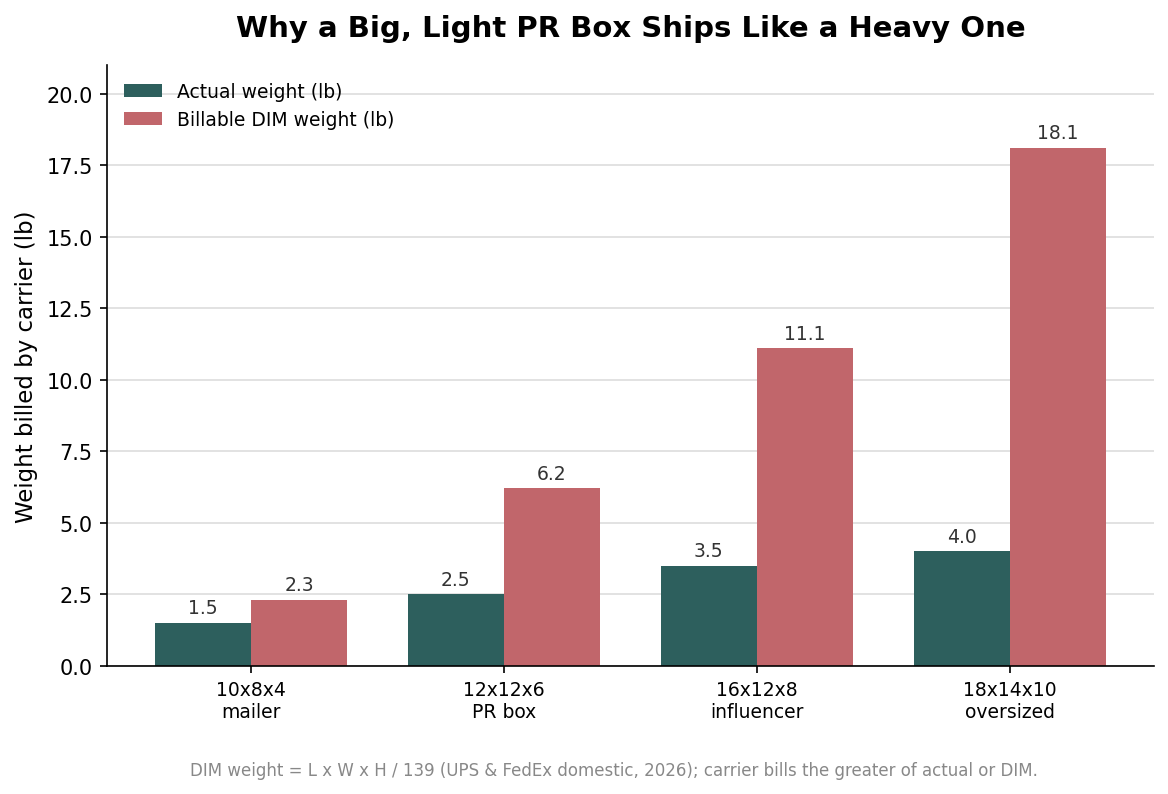
    The most costly error is dimensional, and it never appears on the design proof. Carriers do not bill a light box by its weight; they bill it by the space it occupies, using dimensional weight. For domestic UPS and FedEx shipments in 2026, the formula is length times width times height divided by 139, with each dimension rounded up to the next whole inch, and you pay whichever is greater, the actual weight or the DIM weight. A generous 16 by 12 by 8 inch influencer box that weighs three and a half pounds calculates to about eleven pounds of billable weight. Push it to 18 by 14 by 10 and you are billed for roughly eighteen pounds while shipping four. That is the same box costing four to six times its true weight on every single unit you send.

    The fix is not a cramped box; it is an honest one. Trim an inch off each dimension and the DIM weight falls by a wide margin, because volume is cubic. Design the reveal around a box that is full rather than one that is airy, and you keep the drama without renting empty air from the carrier on every shipment.

    Grouped bar chart comparing actual weight against billable dimensional weight for four PR box sizes
    How dimensional-weight billing turns a large, light PR box into a heavy shipping bill.

    Treating the insert as an afterthought

    The interior is not filler; it is the difference between a product that presents itself and one that tumbles out. A well-made insert holds each item at a set angle so the hero product faces the camera the moment the lid lifts, and it stops the contents shifting on a conveyor. The common failure is ordering a beautiful outer box and then dropping the products into loose crinkle paper, which photographs as clutter and offers almost no real protection. An insert is also where a mid-tier box starts to feel premium, because the hand feels the resistance of a fitted cavity before the eye has processed anything. There is a production cost to this discipline: a custom-shaped insert usually needs its own die or mold, which adds a one-time tooling charge and a few extra days to sampling, so it is worth locking the product lineup before that tool is cut. Reordering a die because a product changed size is the kind of avoidable expense that a fixed packing plan removes entirely.

    Matching the wrong insert to the product

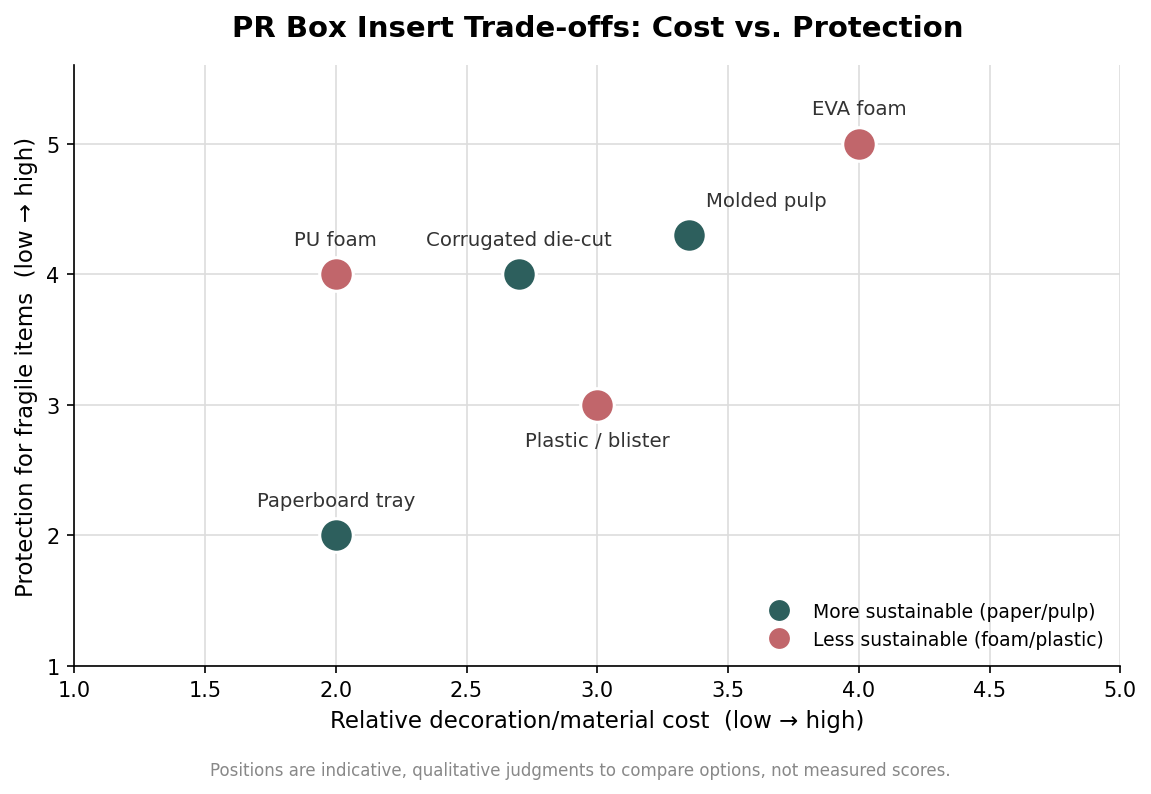
    Insert material is a real decision with real trade-offs. Corrugated die-cut trays, built from E-flute at roughly 1.2 to 2 millimeters or sturdier B-flute at 2.55 to 3 millimeters, are recyclable, mid-priced, and strong enough for most fragile goods. Molded pulp forms a custom cavity from recycled fiber and is the natural choice when sustainability is part of the brand story. Paperboard trays at 300 to 400 gsm suit light items and keep cost down. Foam gives the most cushioning and the most premium grip, with denser EVA feeling more luxurious than open PU, but neither is biodegradable, so it fits electronics and glass more than an eco-forward launch. Plastic and blister inserts mold to any shape but carry weight and sustainability penalties that increasingly clash with creator audiences.

    The mistake is defaulting to whatever the supplier stocks. A glass serum bottle needs a snug foam or molded-pulp cradle; a set of sachets needs nothing more than a paperboard tray; a candle needs a deep corrugated well that stops it sliding into the lid. Choose the insert for the fragility and the story, then let cost follow.

    Scatter plot of PR box insert materials by relative cost and protection, colored by sustainability
    Insert materials plotted by cost and protection; color marks the more and less sustainable options.

    Ignoring what the carrier does to the outside

    Even a perfect interior fails if the exterior cannot survive handling, and 2026 made this harder to ignore. Both major carriers now run automated three-dimensional scanning at their hubs, and a box whose real dimensions differ from what was declared triggers an automatic correction charge, arriving within about three weeks. Industry reporting puts the share of parcels catching at least one correction at roughly five to twelve percent, at an average of two to six dollars each. On a seeding run of a few hundred boxes, that is a line item that appears a month later with no warning. Declare the true outer dimensions, account for the thickness a rigid box adds over its interior size, and the surprise disappears.

    Getting it right without overbuilding

    None of this argues for a heavier, more expensive box; it argues for a deliberate one. Size the outer box to the contents so DIM weight stays close to actual weight, specify an insert that matches the fragility of what is inside, and declare honest dimensions so the carrier’s scanner has nothing to correct. A PR box built this way costs less to ship on every unit, arrives intact often enough to trust with press and talent, and still delivers the clean, full, camera-ready reveal that is the entire point of sending one. The reveal and the shipment are not competing goals; they are the same box, specified with both audiences in mind from the first proof.

  • The Economics of a Great PR Box: What Publicists Should Budget — Customized PR Boxes

    Call or Text us: (929) 605-4397

    HomeBlog › The Economics of a Great PR Box: What Publicists Should Budget

    Economics

    The Economics of a Great PR Box: What Publicists Should Budget

    06/30/2026

    Most PR budgets treat the box as a line item to minimize. That’s backwards. A PR box is one of the few line items in a campaign that can generate its own earned media — a filmed unboxing, a social post, a screenshot in a group chat — if it’s built well enough to be worth showing. The real question isn’t how little you can spend, it’s where the spend pays off.

    Here’s how to think about the budget.

    What actually drives cost per unit

    Three things move the number: box structure (rigid costs more than corrugated), finish (foil costs more than full-color print alone), and volume (per-unit cost drops meaningfully as quantity climbs). At our minimum order of 50 units, expect the higher end of the $6–$18 range; at a few thousand units, the same build often lands well below that.

    Where the spend pays off

    The return on a PR box isn’t the box itself — it’s the content and coverage it generates. A box a creator is proud to film gets posted; a generic shipper gets opened off-camera and forgotten. That earned content routinely reaches far more people than the recipient list itself, which is the entire economic case for spending more per unit on a smaller, higher-value list rather than spreading a flat budget thin across everyone.

    A simple budget split

    A workable approach for most campaigns: allocate a higher per-unit spend — rigid structure, foil accent, fitted insert — to your top 10–20% of recipients (key press, top-tier talent), and a lower-cost, still fully branded build — corrugated mailer, full-color print — to the remainder of the list. You get premium content from your highest-leverage relationships without inflating the cost of a wide seeding run.

    Recipient tierRecommended buildTypical per-unit cost*
    Top 10–20% (key press, talent)Rigid or foil-stamped box + fitted tray$12–$18
    Remaining listCorrugated mailer, full-color print$6–$10

    *Estimates only, illustrative of typical volume pricing — request a quote for your exact specs.

    Setting your campaign budget

    Before locking a number, decide how many boxes genuinely need to be filmable-quality versus simply well-branded. That split, more than any single per-unit price, determines whether your PR box budget generates content or just gets logged as a shipping cost.

    Key takeawaySpend more per unit on your smallest, highest-value recipient list, and a solid full-color build on the rest — the earned content from your top tier is usually the real return on the whole campaign.

    Planning your next campaign budget? Get a custom quote — free mockups in 24–48 hours. Learn more about how we work, or browse more guides.

    More posts

  • How to Order Custom PR Boxes: A Step-by-Step Checklist — Customized PR Boxes

    Call or Text us: (929) 605-4397

    HomeBlog › How to Order Custom PR Boxes: A Step-by-Step Checklist

    Ordering

    How to Order Custom PR Boxes: A Step-by-Step Checklist

    05/24/2026

    A PR box order has more moving parts than a standard packaging order — artwork, insert fit, finish, and a launch date that usually isn’t moving. Missing one of these at the quote stage is the most common reason a first order runs longer than expected.

    Work through this checklist before you request a quote and your mockup will come back closer to final on the first pass.

    1. Confirm what the box needs to hold

    List every item going inside, with rough dimensions for anything rigid — bottles, devices, printed materials. This is what a Custom Insert Tray Set gets built around, so the more specific you are up front, the fewer revision rounds you’ll need.

    2. Pick a structure

    Choose between a Rigid Magnetic-Close, Two-Piece Lid, Corrugated Mailer, or Foil-Stamped Luxury box based on your list size and budget tier — see our rigid-vs-corrugated comparison if you’re unsure.

    3. Decide on finish

    Full-color print is standard on every order. Add spot-UV or foil stamping only where the added cost matches the value of that recipient — typically your smallest, highest-priority list.

    4. Gather your artwork

    Vector files (AI, EPS, SVG, or PDF) move fastest. If you only have a logo photo or PNG, tell us upfront — our designers rebuild it print-ready at no charge, but it’s worth flagging before the mockup stage rather than after.

    5. Set your real deadline

    Give us the actual in-hands date, not the date you’d prefer. Standard production is about three weeks from approved mockup; rush is available, but only if we know the true constraint from the start.

    StepWhat to prepare
    1. ContentsItem list with rough dimensions
    2. StructureBox style matched to list size and budget
    3. FinishFull-color as default; spot-UV or foil for priority recipients
    4. ArtworkVector files preferred, or flag for recreation
    5. DeadlineReal in-hands date, not an aspirational one

    Choosing for your order

    Send us all five of these at once when you request your quote, and we can usually return a mockup that only needs minor tweaks rather than a full rebuild — which keeps your three-week production clock starting sooner.

    Key takeawayThe fastest path to an on-time PR box order is giving us contents, structure, finish, artwork, and a real deadline all in the same request.

    Ready to place your order? Get a custom quote — free mockups in 24–48 hours. Learn more about how we work, or browse more guides.

    More posts

  • Rigid vs. Corrugated PR Boxes: Which Holds Up on Camera — Customized PR Boxes

    Call or Text us: (929) 605-4397

    HomeBlog › Rigid vs. Corrugated PR Boxes: Which Holds Up on Camera

    Buyer guides

    Rigid vs. Corrugated PR Boxes: Which Holds Up on Camera

    05/06/2026

    The question we get most from first-time clients isn’t about color or logo placement — it’s whether to build the campaign around a rigid box or a corrugated one. Both hold up structurally. The real difference is in feel, cost, and what each communicates the moment it’s lifted out of the mailer.

    Here’s the honest comparison.

    Weight and first impression

    A rigid box, built from wrapped chipboard, has real heft — the kind that registers physically before a creator even reads the logo. A corrugated mailer is lighter by design, which keeps shipping costs down but also means it doesn’t carry the same immediate premium signal. Neither is wrong; they’re built for different budget tiers and list sizes.

    How each performs on camera

    Rigid boxes with a magnetic or telescoping lid create a cleaner, slower reveal that reads well in close-up video. Corrugated mailers open more like a shipment than a gift unless the interior is deliberately staged with a printed insert or tissue — once staged, though, a well-printed corrugated box still performs well, just with a different pacing than a rigid reveal.

    Cost at volume

    This is where corrugated pulls ahead decisively. At the same full-color print quality, a corrugated mailer typically costs meaningfully less per unit than a comparable rigid box, and the gap widens at higher volumes. For a seeding list in the hundreds, that difference adds up fast.

    FactorRigid boxCorrugated mailer
    Weight / feelHeavier, premiumLighter, efficient
    On-camera revealClean, slower pacingFaster, needs staged interior
    Relative unit costHigherLower, especially at volume
    Best list sizeSmaller, top-tierLarger, wider seeding

    Choosing for your order

    If your list is under a few hundred and every recipient matters — top press, key talent, flagship retail accounts — a rigid box is worth the added cost. If you’re seeding a few hundred to a few thousand creators and need the spend to stretch, a well-printed Corrugated Mailer PR Box with a staged interior insert delivers most of the presentation at a fraction of the cost. Many campaigns split the difference: rigid for the top tier, corrugated for the wider list.

    Key takeawayRigid boxes win on premium feel and reveal pacing; corrugated wins on cost at volume. Match the structure to your list size and budget rather than picking one for the whole campaign by default.

    Weighing rigid against corrugated for your launch? Get a custom quote — free mockups in 24–48 hours. Learn more about how we work, or browse more guides.

    More posts

  • PR Boxes for Beauty, Tech, and Music: One Format, Three Audiences — Customized PR Boxes

    Call or Text us: (929) 605-4397

    HomeBlog › PR Boxes for Beauty, Tech, and Music: One Format, Three Audiences

    Audience guides

    PR Boxes for Beauty, Tech, and Music: One Format, Three Audiences

    04/19/2026

    We build the same core set of PR box styles for beauty brands, tech launch teams, and music labels — but the way each of those audiences uses the box, and what they need it to do, is genuinely different. Understanding the difference helps you order the right combination of box, insert, and finish the first time.

    Here’s how the same format flexes across three very different launches.

    Beauty & skincare: protection meets presentation

    Beauty boxes carry glass bottles, jars, and often liquid product, so the Custom Insert Tray Set matters as much as the box itself — a fitted cavity keeps everything upright and prevents clinking or leaking in transit. On the exterior, beauty brands lean toward soft, editorial color palettes and a subtle foil or spot-UV accent that photographs well against skin tones and bathroom-counter lighting in a typical review video.

    Tech: structure protects, minimalism sells

    Tech launch teams care most about protecting hardware, so a rigid box with a dedicated tray cavity for the device and accessories is close to mandatory. Branding tends to be minimal — a single logo mark, often foil-stamped in a single metallic tone — because tech unboxing audiences respond to restraint and precision more than pattern or color.

    Music & entertainment: the box is part of the merch

    Music labels often use a PR box to bundle several physical items at once — vinyl, printed lyric sheets, apparel, and a personal note — so a multi-cavity insert tray and a larger Corrugated Mailer or Two-Piece Lid format usually fit better than a small single-item box. Because the box is frequently kept as a collectible by fans and press alike, full-color print with bold artwork tends to outperform a minimal approach here.

    AudiencePriorityTypical build
    Beauty & skincareSecure bottles, soft editorial lookRigid box + fitted tray + light foil accent
    Tech & product launchProtect hardware, minimal brandingRigid box + dedicated tray cavity + single-tone foil
    Music & entertainmentBundle multiple items, collectible appealLarger mailer or lid box + multi-cavity tray + bold print

    Choosing for your audience

    If you’re not sure where your campaign lands, start from what the box needs to physically hold and how much restraint versus boldness your brand voice calls for — the box format library stays the same across all three, but the insert layout and finish choice should follow your audience, not the other way around.

    Key takeawayThe same PR box formats work across beauty, tech, and music — the insert layout and finish choice are what should change to match each audience’s expectations.

    Not sure which build fits your launch? Get a custom quote — free mockups in 24–48 hours. Learn more about how we work, or browse more guides.

    More posts

  • Foil Stamp vs. Spot-UV vs. Full-Color Print: Choosing a PR Box Finish — Customized PR Boxes

    Call or Text us: (929) 605-4397

    HomeBlog › Foil Stamp vs. Spot-UV vs. Full-Color Print: Choosing a PR Box Finish

    Finishes

    Foil Stamp vs. Spot-UV vs. Full-Color Print: Choosing a PR Box Finish

    04/01/2026

    Every finish option we offer can look premium in the right context, and every one of them can look wrong for the wrong budget or brand tier. The question isn’t which finish is best — it’s which finish matches what your box actually needs to do.

    Here’s how the three compare.

    Full-color offset print

    This is the baseline for every box we make and, on its own, it’s often enough. A full-color, direct-to-board print carries photography, gradients, and detailed brand patterns with sharp, saturated color across the whole exterior. It’s the most budget-efficient option at any volume and reads as fully intentional and on-brand without any add-on.

    Spot-UV

    Spot-UV adds a glossy, raised-feeling texture to a specific area — a logo, a pattern, a border — against a surrounding matte finish. It doesn’t add color; it adds tactile and visual contrast, which shows up well in close-up video and under handling, since the gloss catches light differently as the box turns. It’s a lower-cost way to add a premium detail without moving to metallic foil.

    Foil stamp

    Foil is heat-stamped metallic material pressed into the board — gold, silver, rose-gold, or holographic. It reads the most luxurious of the three because it actually reflects light rather than simulating shine with ink, and it holds up permanently since it’s bonded into the surface rather than printed on top. It carries a higher unit cost than spot-UV, which is why we recommend saving it for hero launches, top-tier press lists, or flagship gifting rather than a full wide-list seeding run.

    FinishBest forRelative cost
    Full-color printEvery box, any volumeIncluded as standard
    Spot-UVAdding texture to a logo or patternLow add-on cost
    Foil stampHero launches, top-tier press, flagship giftingHigher add-on cost

    Choosing for your campaign

    A useful rule: use full-color print as your default across a wide seeding list, add spot-UV where you want a texture detail without a big cost jump, and reserve foil for the boxes going to your smallest, highest-value list — top press, key talent, or a flagship product. You can mix finishes across the same campaign; a Corrugated Mailer PR Box in full color for the wide list and a Foil-Stamped Luxury PR Box for the top ten recipients is a common and cost-effective split.

    Key takeawayFull-color print is the strong default, spot-UV adds texture at low cost, and foil is worth the premium only for your smallest, highest-value recipient list.

    Ready to choose a finish? Get a custom quote — free mockups in 24–48 hours. Learn more about how we work, or browse more guides.

    More posts